
No Sweat Cuff Tutorial: Set-In Sleeve Pattern Hack
- Oct 8, 2019
- 3 min read
Updated: Aug 14, 2021
Chicago fall what's up I am feeling you right now. I've been working on these #sewrevamped looks for each Sew & Tell pattern and finally the weather is starting to feel the part.


Nothing screams fall more to me than a voluminous bishop sleeve, amirite?! The cooler temps have me wanting fall versions of my #memade closet staples and of course the Tied Up Top is a heavy hitter! It didn't hurt I've had a few requests on how to hack the Tied Up Top to have long sleeves either ;)
A few of these new hacks are including free pattern add-ons and I am seriously so excited. Yep, I’m including a FREE fully sized sleeve pattern that you can add to your Tied Up Top pattern collection!
So head on over and download the files here. (There’s a US Letter, A4 and A0 versions)

I want to show you how to utilize this little freebie. It’s super easy, per the usual, but I'm gonna run through it so you there aren't any questions.
I highly recommend using the layers feature when printing this bad boy out. All the nested lines can get a little confusing and this way you just print the size you need! You can do this by turning them off at the side of your document before you hit print.
Alright, so once you’ve printed and assembled your pattern you’ll need to pull out your existing Tied Up Top pattern.
Snag the Side Front Hack pattern piece and lay it on top of the Side Front piece of your existing pattern. You’ll want to match up the shoulder seams which will line everything else up. I've already allowed for a 1/2" seam allowance so no need to add any!
Depending on your preferences you can just cut into your existing pattern to create this new pattern piece, but if this sounds like pattern sacrilege then perhaps trace this new piece onto a separate sheet of paper.
Now, toss your Side Front pieces to the side. Pick up your Center Back Hack and the Center Back pattern pieces. You’re gonna want to lay the hack piece on top of the pattern piece – just like you did on the Side Front.
Once you’ve traced or cut one side, flip that hack piece over and repeat for the other half.
That’s it for hacking the pattern. You’ll follow the instructions as-is just exclude the bit about sleeve hems and follow me below on the sleeve and cuff stitching.
So let’s talk about stitching up this sleeve. I like to start with sewing the continuous placket first, if you’ve never done one, go ahead and click on over to my One-Step Placket tutorial and read all about it.


After the placket is in, go ahead and place sides of the sleeve right sides together and stitch on down the sleeve seam.
This particular bishop sleeve is gathered where if meets the cuff so whatever your choice method for gather is is go ahead gather the bottom edge.
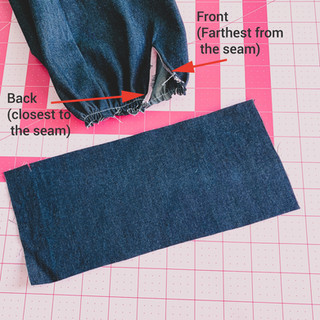
Time to pick up one of the Sleeve Cuff pieces. Matching the Back of the placket to the notch on the cuff, stitch around leaving 1/2” on the cuff at the Front.
I like to tuck Front placket towards the back so that when it's finished it lays on-top of the Back placket.

My next step might sound a little wacky but it’s the way I stitch a cuff up to avoid having to press anything before I’m done. I overall prefer the way it turns out too.
I just fold the long edges of the cuff to meet each other
I just line up the long raw edge to the edge that I just attached to the sleeve, right sides together. Then I just stitch a little bit past my previous stitch to the cuff but I only go about half way across.


Then I flip on over to the other side, lining up the other side of the cuff's edge and stitching across, leaving just a small opening. When I've stitch as much as I can on each side it looks sort of like this second picture...


Last before you turn this broad right-side-out you'll need to stitch across the ends of the cuff.
Turn all that cuff business right-side-out.
Using something pointed push out the edges of your cuff.
With the front of the cuff facing up, top-stitch along the cuff’s edge all the way across – make sure you are closing up that small hole you left.

That’s it for sewing up this sleeve. Set in your sleeve as you would any set-in sleeve. There’s very little ease so you shouldn’t need to gather your sleeve cap at all.
I’m so excited to see how you Seamsters stitch up this new pattern! Keep me posted and tag me with your makes!


Comments